🎈 빌더 패턴(Builder Pattern)
•빌더 패턴은 생성이 복잡한 객체를 단계적으로 만들 수 있다.
→ 생성 코드 따로 관리
• 객체 생성을 별도의 다른 클래스에 위임
•생성자 호출 코드를 한 줄로 생성하기 어려운 객체에 적합
• 디자인 패턴 중 생성 패턴에 해당된다.
💻 디자인 패턴(Design Pattern)이란?
👨💻 디자인 패턴(Design Pattern)이란? • SW 개발 방법 중에서도 구조적인 문제 해결에 목적을 둔다. • 알고리즘과 같이 특정 문제를 해결하는 Logic 형태보다는 특정 상황에 적용할 수 있는 방
zoosso.tistory.com
[예제 코드]
빌더 패턴을 적용하지 않고 다양한 속성을 지닌 객체를 생성해보자.
#include <iostream>
#include <string>

class Car {
public:
    Car(const std::string& brand, const std::string& model, const std::string& color,  int year, double price)
        : brand_(brand), model_(model), color_(color), year_(year), price_(price) {}
    void ShowInfo() {
        std::cout << "제조사: " << brand_ << "\n모델명: " << model_ << "\n색상: " <<  color_
            << "\n연식: " << year_ << "\n가격: " << price_ << std::endl;
    }

private:
    std::string brand_;
    std::string model_;
    std::string color_;
    int year_;
    double price_;
};

void main() {
    Car car("기아", "스포티지", "쥐색", 2024, 4000);
    car.ShowInfo();
}
객체 생성자 호출 부분에서 다양한 속성으로
다소 복잡해진 것을 느낄 수 있다.
이러한 객체 생성을 보다 단계적으로 할 수 없을까?

[예제 코드]
#include <iostream>
#include <string>

class Car {
public:
    void SetBrand(const std::string& brand) {
        brand_ = brand;
    }
    void SetModel(const std::string& model) {
        model_ = model;
    }
    void SetColor(const std::string& color) {
        color_ = color;
    }
    void SetYear(int year) {
        year_ = year;
    }
    void SetPrice(double price) {
        price_ = price;
    }
    void ShowInfo() {
        std::cout << "제조사: " << brand_ << "\n모델명: " << model_ << "\n색상: " <<  color_
            << "\n연식: " << year_ << "\n가격: " << price_ << std::endl;
    }

private:
    std::string brand_;
    std::string model_;
    std::string color_;
    int year_;
    double price_;
};

class CarBuilder {
public:
    CarBuilder() : car_(new Car) {}
    CarBuilder& SetBrand(const std::string& brand) {
        car_->SetBrand(brand);
        return *this;
    }
    CarBuilder& SetModel(const std::string& model) {
        car_->SetModel(model);
        return *this;
    }
    CarBuilder& SetColor(const std::string& color) {
        car_->SetColor(color);
        return *this;
    }
    CarBuilder& SetYear(int year) {
        car_->SetYear(year);
        return *this;
    }
    CarBuilder& SetPrice(double price) {
        car_->SetPrice(price);
        return *this;
    }
    Car* GetCar() {
        return car_;
    }

private:
    Car* car_;
};

void main() {
    CarBuilder builder;
    builder.SetBrand("기아")
        .SetModel("스포티지")
        .SetColor("쥐색")
        .SetYear(2024)
        .SetPrice(4000);

    Car* car = builder.GetCar();
    car->ShowInfo();
    delete car;
}
CarBuilder 객체에게 위임하여
복합 객체 생성을 단계적으로 정의하였다.
각 단계별 수행행을 보다 엄격하게 제한해볼 수도 있다.
ex) 잘못된 수치를 넣은 경우 수행 X
🎈 빌더 패턴 장단점
+ 코드를 분리하였기에 가독성과 유지보수 측면 향상이 있다.
+ 객체 생성시 선택적인 매개변수를 구분할 수 있다.
+ 객체가 불변성(immutable)을 갖도록 하여
멀티 스레드 환경에서 안정성을 가질 수 있다.
+ 객체 재사용: 동일한 빌더를 기반으로 다양한 객체를 생성 가능
- 빌더 클래스를 추가적으로 만들어야 하기 클래스 개수가 증가할 수 있다.
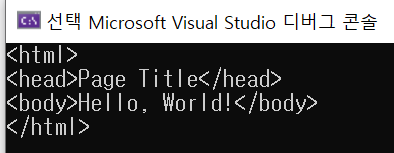
[예제 코드]
빌더 패턴 활용한 HTML 문서 구성
#include <iostream>
#include <string>

class HTMLBuilder {
public:
    HTMLBuilder(const std::string& rootName) {
        rootName_ = rootName;
        html_ += "<" + rootName + ">\n";
    }

    HTMLBuilder& addTag(const std::string& tagName, const std::string& tagText) {
        std::string tag = "<" + tagName + ">" + tagText + "</" + tagName + ">\n";
        html_ += tag;
        return *this;
    }

    std::string getResult() {
        html_ += "</" + rootName_ + ">\n";
        return html_;
    }

private:
    std::string rootName_;
    std::string html_;
};

void main() {
    HTMLBuilder builder("html");
    builder.addTag("head", "Page Title")
           .addTag("body", "Hello, World!");

    std::string htmlDocument = builder.getResult();
    std::cout << htmlDocument;
}
• 클라이언트 코드는 HTMLBuilder를 사용하여 HTML 요소를 추가할 수 있다.
• getResult 메서드를 호출하여 최종 HTML 문서를 얻을 수 있습니다.

'까망 동네 > 디자인 패턴' 카테고리의 다른 글
| [디자인 패턴] 브릿지 패턴 (Bridge Pattern) (3) | 2023.10.28 |
|---|---|
| [디자인 패턴] 중재자 패턴 (Mediator Pattern) (0) | 2023.10.22 |
| 💻 [디자인패턴] 전략 패턴 (Strategy Pattern) (1) | 2023.10.19 |
| [디자인패턴] 싱글턴 패턴 (0) | 2023.10.14 |
| [프로그래밍] 디자인 패턴 필요성 (0) | 2022.08.29 |


댓글